Rescatux 0.71-beta7 – Not a review
Download
| (Torrent) | MD5SUM: ee5efcc09e4d9011d8bd865f354dae84 |
Introduction
This last week I have been unable to sleep. Why? My friend adrian15 told me about him releasing another beta version of Rescatux. The last Rescatux beta was released on December 2017. That’s more than a year ago.
He has been hyping me about all those new features that this iso is going to have for the past two months. And he has also bothered me with all the problems he had been finding along the way. He is very persistent because he has finally managed to work around most of them.
So, the first thing I want to point out is that Rescatux, as you might know is usually based on Debian stable. Well, Rescatux 0.51b3 was based on Debian Jessie 8 and Rescatux 0.71 beta is based on Debian Buster 10 which happens not to be a Debian stable because it has not been released yet.

But Debian Buster is frozen and it will be released as Debian stable in less than a year.
Using Debian Buster 10 instead of Debian Jessie 8 as a base means that more recent hardware will be supported out of the box. And that’s great because I recently bought a HP250 G6 2SX60EA laptop and I want to test Rescatux on it. So that I can give adrian15 more work Ha Ha Ha !
The other nice about this iso is the many ways it can be booted. Super Grub2 Disk which has an hybrid boot that supports i386-pc, ia32-efi and amd64-efi boots is from the same author. So you should not an expect an amd64 only disk and an i386 only disk but an hybrid one.
And that’s what you get. Here there is a boot options summary table:
| Secure Boot | BIOS/EFI platform | Kernel Arch | Boot? |
|---|---|---|---|
| Secure Boot | BIOS/EFI platform | Kernel Arch | Boot? |
| Secure Boot | BIOS/EFI platform | Kernel Arch | Boot? |
Have you noticed it? Yeah, that’s it. Now Rescatux 0.71 beta 7 gets Secure Boot support from Debian Buster. And it’s Secure Boot which works with Microsoft Secure Boot enabled machines. So we are not going to need to tweak our UEFI firmware to be able to boot Rescatux. Yay!
What more about boot? Yes, there is this liveid thing that adrian15 made up so that some hp laptops that come with live-build installations do not confuse Rescatux boot. That’s supposed to be a new standard for live cds but according to what he has told me not many distros are willing to adopt it.
It’s UUID for live cds he has told me. It should be make easier the work of Yumi, Rufus, Easy2Boot and similar tools if combined with loopback.cfg according to him. Go figure.
Hands on – Boot
Enough talking. Let’s boot the iso and see what we get at.
I’m getting an isolinux menu with a countdown when booted in BIOS mode. Look at that! The poor tux penguin has beta 7 all of over his face! XD XD XD . This needs to be fixed in the next stable release. #FreeTuxFromBeta7
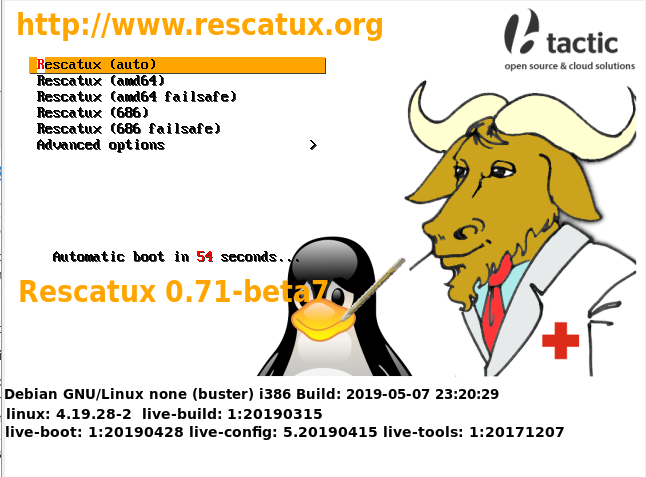
However when I boot in UEFI mode I am not getting a countdown and the default boot entry cannot be seen because it’s white and the background is also white. I remember seeing this same problem in Rescatux 0.51b3. This has not been definitively been fixed.

Rescatux Desktop
What about having a laptop with a semi broken screen? I had to install open-vm-tools-desktop package on my virtualbox instance but I finally managed to make it work with two screens. That way I can show it to you without using a blurry mobile phone photo 😉 . Guess what? Rescatux gets you covered because you can start the monitor settings when monitors are horizontally stretched. The dialogs concerning monitor settings are centered among the two monitors.
So that means that I can finally recover my old broken screen laptop. I just disable my laptop screen and leave enabled the external screen. And there’s no need for me to learn hotkeys and commands to run those screen setup screens manually.
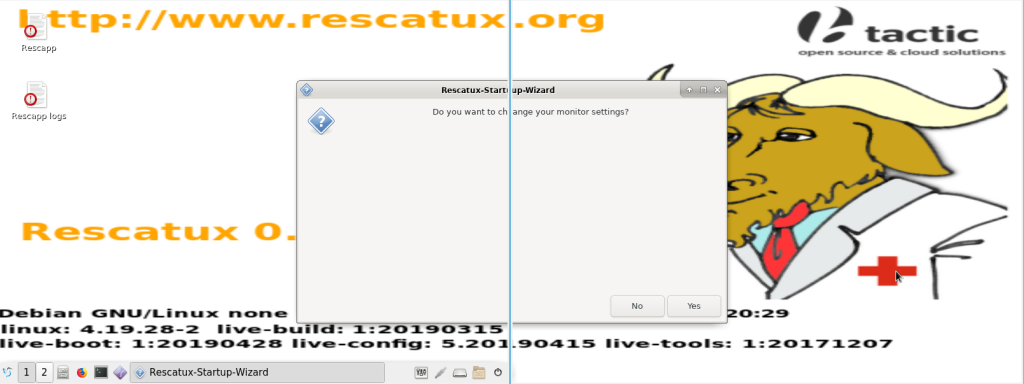
By the way this monitor settings dialog is a part of the new Rescatux startup wizard.
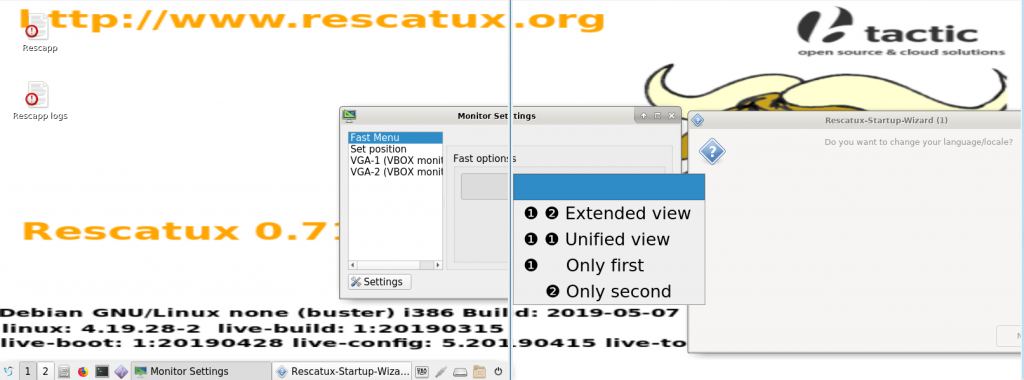
Rescapp was already a wizard for your rescue tasks but adrian15 managed to add this new wizard for the live cd itself. These new Rescatux startup wizard feature are quite neat so that you can customize your Rescatux session.
- Change monitor settings
- Change language/locale
- Change keyboard layout
- Turn off VNC Server or change its password
VNC Server. That is an interesting feature for youtubers and maybe cloud users.
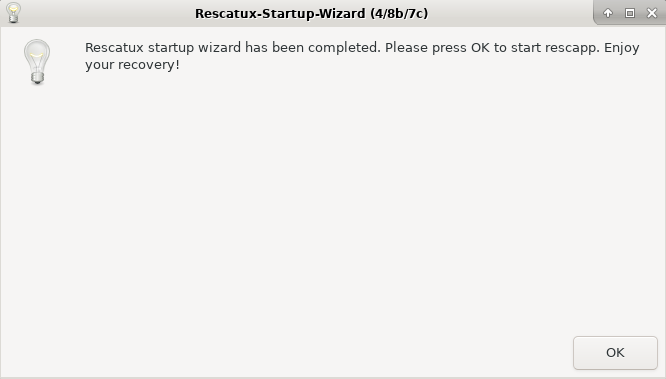
Now Rescatux starts up a VNC server at startup so that you can access it from the network. I have asked adrian15 on how to setup an static ip from boot parametres as I had seen in the past in GRML but he has told me it is not implemented yet. ‘You have to rely on dhcp or setup the static ip manually.’ he has told me. Look at this, we are ready to run Rescapp. Finally! This was getting bored because Rescapp is what matters in this distro.
Is this Rescapp?
What do we have here? This is Rescapp. But this is not the Rescapp that I know of with all those options. Let’s read the windows title:
Rescapp Self-Test
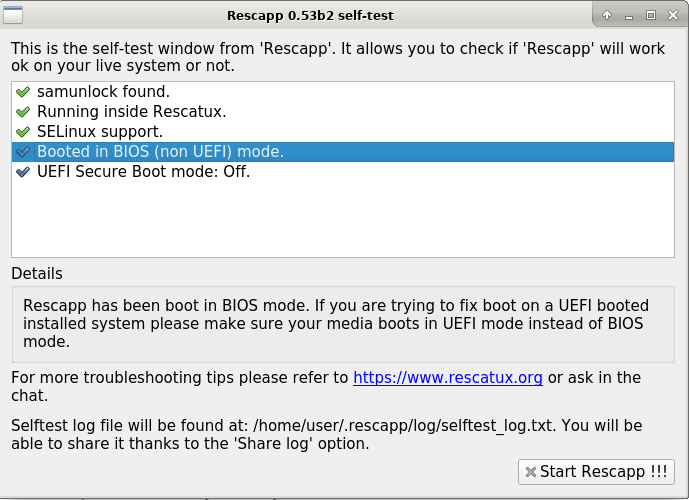
I first thought this screen was meant for people to know if they had boot in Secure Boot or in UEFI mode. That’s useful because when playing with UEFI and BIOS boot I have learnt that every OS in the computer needs to be either boot in UEFI mode or in BIOS mode. Not the two of them mixed.
Later on, while discussing with adrian15 about this option he has told me about him converting rescapp and chntpw (what makes possible to reset Microsoft Windows passwords) into proper Debian packages. As Rescapp is available as an upstream package or as a Debian package it might appear in other distros without being able to show its full potential.
So now when a distro lacks SELinux support you know. If the distro has not packaged the forked version of chntpw that Rescapp uses then you also know. But you are not forbidden of using Rescapp. Maybe SeLinux support (needed by RHEL, Fedora, Centos,…) is not used by your usual distro so it does not affect you.
So Self-test not only helps you to diagnose if you have boot in the proper mode (UEFI or BIOS) but also if your live cd is lacking some of the Rescapp requirements.
After you click on the Start Rescapp !!! button you finally get out beloved Rescapp.

Rescapp not so updated and angry call
I took a depth look into Rescapp for about long thirty minutes but I didn’t see anything relevant. This was confusing. I was expecting some Secure Boot options now that Rescatux could boot from Secure Boot machines. I was expecting him to fullfill all of the options embeded html documentation that I had complained to him when he released 0.51b3 version and I had to dig inside his rescapp scripts to understand them.
I had to phone adrian15.
He laughed at me. He was expecting my call. Too much work on putting up Rescatux up to date and adding all of those fancy wizards was his explanation. When I was going to complain to him about the awful design of the beta7 text in front of the now sad penguin he told me: Pull requests are welcome and he hung up the phone on me!
HI,
I’ve been using Rescatux and Super Grub2 Disk for some years now, to save me from broken grub installations. I do distro hop a lot and often trash my boot and the disks have really helped me out. So thank you for all the work you have done, and continue to do on this project.
I wanted to comment about the monitor settings dialogue issue, which is something I have had trouble with in the past. It’s actually quite an easy key combination to learn. Just press Alt+Space, then m. (Alt+Space is the drop down menu on a window that you normally get by right clicking on it and m is for move.) Then you can move the dialogue from the broken screen with the mouse or arrow keys 🙂
Hope this helps, although you have obviously worked around it.
Regards,
Moulder.
nie wiem jakie dane nalezy podac przy konfiguracji sieci wifi …
You can visit: https://github.com/rescatux/rescatux/issues for support.